WPForms is a WordPress plugin that makes it easy to collect payments and donation from a website. To collect donations, one needs a WPForms plugin.
Table of Contents
Step by step guide on Donation Form Creation
In this article, we are going to discuss the step by step guide of creating a donation form for a non-profit organization. We are also going to discuss how to collect the donations and the benefits of having an online donation form.
For the donation form creation to be successful, you’ll need a self-hosted website. You will also need a WPForms pro version plugin and a payment Addon.
Step 1: Create a Non-Profit Donation Form
The first step we are going to install and activate the WPForms plugin. Before installing the plugin, go to the WPForms website and purchase the Pro Version Plugin. After paying for the WPForm plugin, download the plugin.
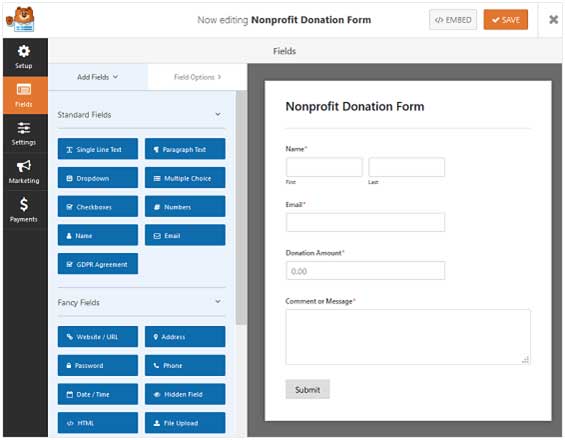
To Install the WPForms plugin, go to the WordPress dashboard and click on the Plugins>>> Add new>>>Upload a file and upload the downloaded file and then Activate it. After the plugin is activated successfully, go to the WPForms>>>Add New. Name the form and select the Donation form template.

Step 2: Customize the Form Fields
The next step is to customize the donation form fields to your specifications and for them to look at how you like.
The donation form is a single item that gives the users the option to enter the amount they want to donate. When people are donating, they don’t know the amount to donate and to help them solve the dilemma, add the Multiple choices to give them an option on the money they can donate.
To add the Multiple choices, Drag the Multiple items field and drop it above the Donation amount field. After this, change the label to Donation amount and rename the items with options of the amount of money one can donate.

Step 3: Configure your Form Notifications
The next step is to configure the notifications for your form. The notification field notifies you when someone donates.
To configure the notifications, click Settings>>> Notifications. On this step, you can also change the email if you want to use a different one.

Step 4: Configuring your Form Confirmations
The confirmation field helps to display messages to the visitors after their donation. It tells them that you received their donation.
The confirmation is in the form of;
- You can send the visitors a message confirming that you have received the donation.
- URL redirect. The URL redirect direct your visitors to a page thanking them for their donation.
- Confirmation page. You can also redirect the visitors to a page. The page tells the visitors that you have received their donation.
To configure the confirmations, click on Settings>>>Confirmations. On the confirmation type field, select Messages and write the message you want the visitors to receive after donating. After you have finished configuring the confirmation settings, click on Save.
Step 5: Configure your Payments
The fifth step is to configure the donation form Payment. For payments, one can use either PayPal or Stripe payment type. In this article, we are going to use PayPal as our payment method.
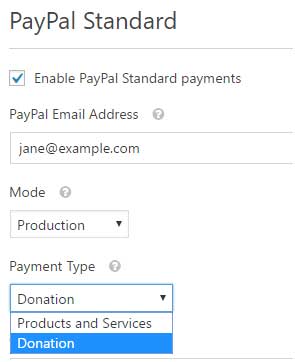
To configure payments, click on Payments >>> PayPal standard. After clicking on the PayPal standard, you are going to get a prompt to install an Addon. Install the Addon and then Activate it. After the Addon activates, save and go back to the PayPal Standard field.

On the PayPal standard field;
- Click on the checkbox to enable PayPal standard payments.
- Add the email address you are using for your non-profit organization.
- For the mode, select production.
- For the payment type, select
- If your visitors want to cancel, send them a cancel URL.
- For the shipping settings, select what you prefer.
- You can either allow the buyer to include a note with payment or not.
After you finish configuring all the settings, click Save.
Step 6: Additional of the Non-Profit Donation Form to your Website
The last step of the guide is to add the donation form to your website page or the pages you want it to appear on. Adding the donation forms on the website makes sure every visitor that visits your website sees it.
To add the donation form to a page, click on Pages>>>Add New>>> name the page as Donate. After giving a title to your page, click on add form and select donate and then click on publish. After publishing, the donation form will go live.
Every time a visitor visits your website, he/she can see the donation form.
Summary
The guide is providing us with simple steps to create an online donation form that we can use to collect donations from a website.
The online donation form has many advantages. The advantages are:
- Donation forms attract donations easily. Filing a donation form is a process that takes little time. Thanks to this feature, they attract many donors.
- Easy to connect You can connect with your visitors from the information you retrieve from them.
- The fact that the donations are online makes it easy for anyone in the world to access the form. And this leads to more donations
Non-profits should adopt online donation forms to ensure they are transparent with their operations. Using online donation forms gives you a hedge over other non-profits that do not use them.
If you want to create a donation form, you should follow the simple steps we have discussed. The steps are simple and also provide the advantages associated with online donation forms.
I would, therefore, advise all non-profits that are not using online donation forms to start using them. The donation form will help them get funds to run their organizations transparently while ensuring the confidentiality of their donors.
All this information is what makes the online donation forms a preference for donation by donors and non-profits.
What else can you do with WPForms?


